

Spatial video on iPhone lets you record immersive 3D memories you can relive on Apple Vision Pro. Here is everything you need to know to start recording today. Spatial video records two video views at the same time with the Main and Ultrawide cameras, then combines them into one 3D clip that still plays like normal video on other devices.
Right now, spatial video recording works on iPhone 15 Pro, 15 Pro Max, 16 Pro, 16 Pro Max, 17 Pro, and 17 Pro Max. If you want to learn how to use iPhone spatial video, you just need one of these Pro phones, the right iOS version, and a few simple camera habits.
This guide walks you through setup, shooting, and viewing. You will turn on the correct setting, follow clear shooting rules, fix common problems, and watch your clips on Apple Vision Pro without guesswork.
This guide covers everything you need to know about how to use iPhone spatial video from first setup to playback.
Key Takeaways
- See exactly which iPhone models support spatial video, so you can confirm your phone before you waste time in the Camera app. This removes confusion when the Spatial icon does not appear. You will know right away if you need a Pro model.
- Get the precise settings path to enable spatial video, down to each tap. This includes the Formats screen and the toggle name you must turn on, so you are not hunting through menus while a moment is happening.
- Learn the best shooting practices for clean 3D footage, focused on distance, lighting, and stability. These three rules have the biggest effect on comfort in Apple Vision Pro. With them, your clips can feel natural instead of tiring.
- Understand how to move your spatial clips to Apple Vision Pro and start playback. Both iCloud and AirDrop flows are covered in simple steps, so you can pick the method that fits your internet connection and storage.
- See how spatial video differs from Cinematic Mode and when to use each one. That comparison helps you pick the right mode for each scene. Cinematic Mode still matters, and Cinematic Mode tutorials show how both features fit together in a mobile video workflow.
What is iPhone Spatial Video and Which iPhones support it?
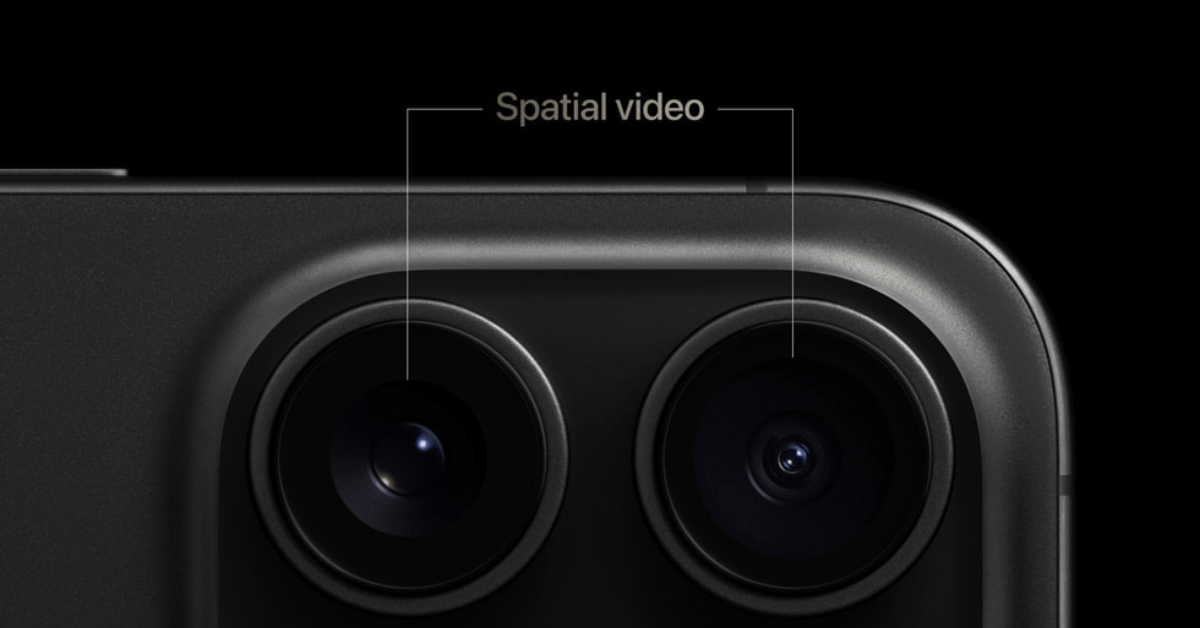
iPhone spatial video is a 3D video format that captures real depth by recording two views at once and storing them in one file. The iPhone uses two rear cameras together to capture both views simultaneously, then aligns them so the views match like a pair of human eyes. When you watch that file on Apple Vision Pro, each eye sees a slightly different view, and your brain reads that as depth.
Under the hood, the phone records two 1080p streams at 30 frames per second and packs them into a single HEVC file with extra depth data. On your iPhone, iPad, or Mac, the clip behaves like a regular high‑quality 2D video, since those devices just ignore the second view. On Apple Vision Pro, visionOS reads the hidden data and turns the flat rectangle into a small window into the scene.
Only certain iPhones can record this format. Today that list is:
- iPhone 15 Pro and 15 Pro Max
- iPhone 16 Pro and 16 Pro Max
- iPhone 17 Pro and 17 Pro Max
These Pro phones place the Main and Ultrawide cameras side by side when you hold the phone in landscape, which is key for good depth. They also use Pro‑level chips that can align two video streams in real time without dropping frames.
Standard iPhone 15, 16, and 17 models do not support spatial video. Their lens layout and processors are not built for this feature, so the toggle never appears in Settings. Cinematic Mode works on many more models, but full spatial capture stays on the Pro side for now.
How is spatial video different from Cinematic Mode?
Spatial video and Cinematic Mode both play with depth, but they do it in very different ways:
- Cinematic Mode records a normal 2D clip, then uses software blur to imitate shallow depth of field and guide attention.
- Spatial video records real depth with two cameras, so the feeling of volume comes from parallax between the two views, not blur.
Cinematic Mode works on a wider range of iPhones and is perfect for traditional stories you share on a flat screen. Spatial video shines when you plan to watch later on Apple Vision Pro or another stereoscopic viewer. You cannot run the two modes at the same time, but the same framing ideas carry over.
You will notice that Cinematic Mode principles from guides on Cinematic Mode, like clean subject placement and controlled movement, also make spatial clips feel more natural. The table below shows the main differences at a glance.
| Feature | Cinematic Mode | Spatial video |
|---|---|---|
| Recording style | Single 2D view with software blur | Two synced views with real depth |
| Supported iPhones | Many recent models, not just Pro | iPhone 15 Pro, 15 Pro Max, 16 Pro, 16 Pro Max, 17 Pro, 17 Pro Max |
| Best viewing device | iPhone, iPad, Mac, TV | Apple Vision Pro for full 3D, 2D on other Apple devices |
| Depth effect | Artificial background blur | True stereoscopic depth |
| Best use case | Directed stories with focus pulls | Life moments you want to relive in 3D |
How to set up spatial video on your iPhone (exact settings steps)
To understand how to use iPhone spatial video, start by setting up your iPhone correctly. First confirm software support, then turn on one toggle in Settings. Any supported Pro model must run at least iOS 17.2, and you get the smoothest results on the latest iOS version. Once the feature is active, the Camera app gains a Spatial control so you can record clips on demand.
Storage matters as well. A minute of spatial video at 1080p 30fps is roughly 130 MB, which adds up fast over a busy weekend. Before you flip the switch:
- Open Settings → General → iPhone Storage and check how much free space you have.
- If you rely on iCloud Photos, confirm your plan has enough room for several larger clips.
This setup step is quick, and you only need to do it once. After that, you turn Spatial on or off from the Camera app with one tap.
Step-by-step: Enabling Spatial Video in Settings
Before you pick up your phone to record, it helps to follow the same setup flow every time you get a new iPhone or install a major update. Once this switch is on, the Camera app remembers it and keeps spatial controls ready for you.
- Settings path
Open the Settings app, then tap Camera and choose Formats. Scroll until you see Spatial Video for Apple Vision Pro and turn that toggle on. You may see a small note that spatial clips use more storage, which matches real‑world use. - iOS 17 camera activation
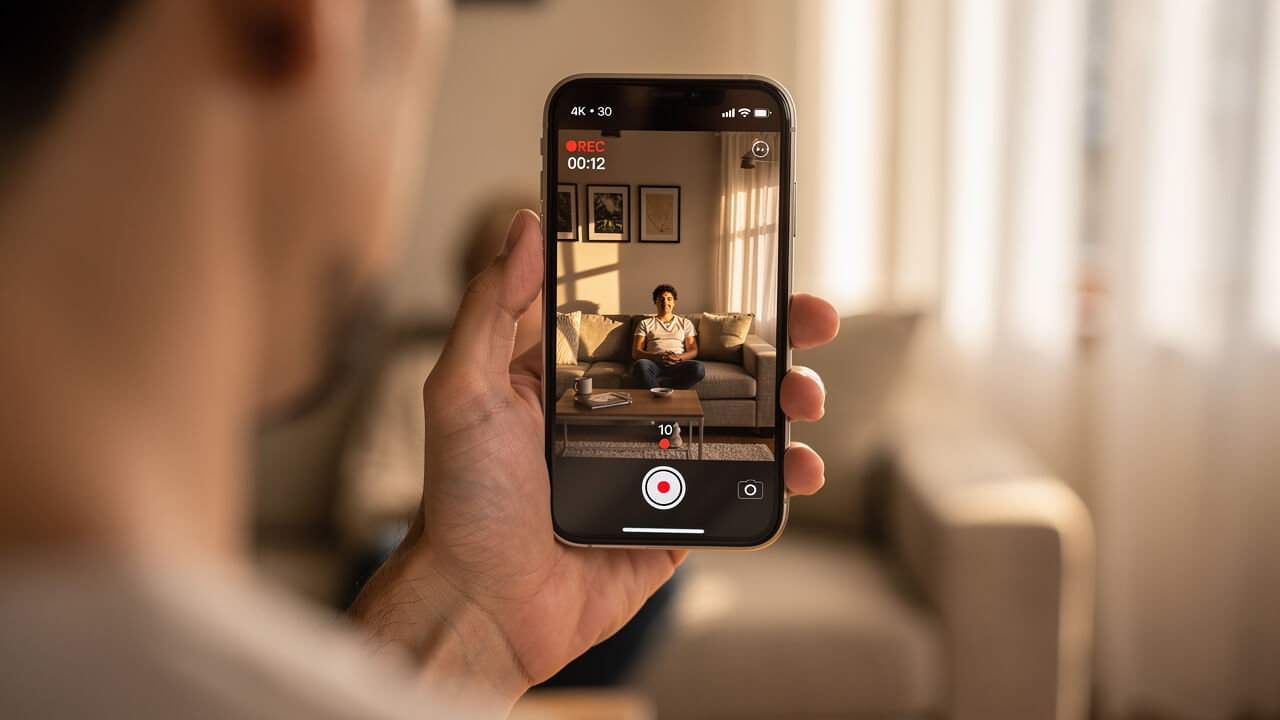
Open the Camera app and swipe to Video mode along the bottom bar. In the lower left you will see a tiny Apple Vision Pro headset icon that controls spatial video. Tap that icon so it lights up, then rotate your iPhone to a horizontal position before you start recording. - iOS 18 camera activation
Open the Camera app and swipe right across the mode list until you find Spatial. When you choose this mode, the viewfinder hints that you should turn the phone sideways. Once the on‑screen level line settles, tap the record button to start, and tap again to stop. - Landscape requirement
Your iPhone must be in landscape when you record spatial clips, since the Main and Ultrawide cameras only sit side by side in that position. If you try to hold the phone in portrait, the app shows a clear rotate message and will not capture a 3D file. Treat that prompt as a hard rule instead of a suggestion.
Tip: Before a big event, do a 10‑second test clip and check that the spatial icon was on. It is much better to catch a missed toggle in a test than after a once‑only moment.
How to Use iPhone Spatial Video: Shooting Best Practices
Once you know how to use iPhone spatial video settings, recording feels a lot like regular video once you know a few extra rules. You enable the Spatial control, hold the phone in landscape, and tap record, but the way you move and frame the scene has a much bigger effect on comfort. Good distance, clean light, and stable movement matter more here than with flat clips.
Think of your iPhone as a small 3D camera. You are not just capturing what things look like, you are also capturing how far away they are. That means a fast pan or a subject that stands too close can turn into eye strain on Apple Vision Pro, even if it looked fine on the phone.
Below are the habits that made the biggest difference in real‑world tests on an iPhone 15 Pro. When they were followed, clips felt natural and easy to watch. When they were ignored, friends pulled the headset off within a few seconds.
Keep your subject 3 to 8 feet away

Spatial video works best when the main subject sits in a sweet spot in front of the camera. Aim for roughly 3 to 8 feet (about 1 to 2.5 meters) between the lens and the person or object you care about most. Within that range, the separation between the two iPhone cameras gives Apple Vision Pro enough information to show clear depth without strain.
If you move closer than 3 feet, each eye gets a very different view from each lens. In the headset, that can force your eyes to cross in an uncomfortable way and can cause double edges on faces or objects. The moment feels intense instead of pleasant.
Past about 8 feet, the opposite problem appears. The cameras sit so close together that they no longer see much difference in parallax, so the clip looks flat even in spatial mode. To keep things interesting:
- Place your main subject around 4 or 5 feet away.
- Look for a simple foreground object (like a table edge or plant) near the frame to build extra layers.
- Include a background with a bit of separation (a wall, trees, or furniture) so the depth feels clear.
Use bright, even lighting and keep the camera steady
Light and stability make or break the 3D feeling. Spatial clips love soft daylight or a well‑lit room with even light across faces and backgrounds. In dim spaces, each sensor boosts gain in a slightly different way, so grain appears in one view that does not match the other, which shows up as shimmer inside Apple Vision Pro. Try to avoid deep shadows or a very bright window right behind your subject, since both can confuse depth processing.
Stability matters even more. When someone wears the headset, their inner ear feels still while their eyes follow whatever motion you recorded. If the camera jitters, that mismatch can cause nausea fast. A smooth camera feels invisible, which lets your brain relax and focus on the moment instead of the motion.
Here is a simple stability toolkit that works well for spatial video:
- Two‑handed grip
Hold the phone with both hands and press your elbows into your ribs. This turns your body into a simple tripod and cuts down on tiny shakes. If you need to change framing, move your whole upper body instead of just your wrists. - Tripod for static shots
For things like birthday songs or a baby’s first steps, a small phone tripod works wonders. You frame once, hit record, then forget about the phone and interact freely. Because the frame does not sway, the scene in Apple Vision Pro feels like you stood there again. - Motorized gimbal for motion
If you like to walk with the camera, a three‑axis gimbal smooths bumps and keeps the horizon level. Simple slow pushes toward a subject or slow sideways moves feel great in spatial video when the gimbal handles the micro shakes. Cinematic Mode covers advanced gimbal patterns, and those same patterns translate very well to spatial clips. - Slow, deliberate pans
When you want to pan across a room, plant your feet and rotate from your hips instead of waving your arms. Start slow, keep the horizon line flat, and avoid sudden speed changes. In a headset, that kind of controlled move feels more like a gentle head turn than a roller coaster.
Think of your camera move like a head turn from a seated person. If it would feel odd to move that fast in real life, it will feel odd in the headset too.
How to view spatial video on Apple Vision Pro
Once you have a few good clips on your iPhone, the fun part starts on Apple Vision Pro. The flow has two steps. First, you move the files from your phone to the headset with iCloud Photos or AirDrop. Then you open the Photos app in visionOS, find the Spatial section, and pick how you want each clip to play.
The good news is that file transfer uses the same tools you already know from regular photos and videos. You do not need extra cables or new apps. As long as both devices share the same Apple ID or sit near each other, you can go from record to playback in just a few taps and hand gestures.
Transferring your footage: iCloud vs AirDrop
For most people, iCloud Photos is the easiest way to move spatial clips without extra thought. If your iPhone and Apple Vision Pro are signed into the same Apple ID and both have iCloud Photos turned on, every spatial video you record uploads in the background. As long as you have enough iCloud space, the clip appears in the Photos app on the headset after a short sync delay.
When you want to see a new clip right away or your internet is slow, AirDrop gives you a more direct path. AirDrop uses a private wireless link between your iPhone and Apple Vision Pro, so the file never touches the internet. You control exactly which clip moves and when.
- Open Photos on your iPhone and tap to open the spatial clip you want to send. Check that the little Spatial badge appears in the corner so you know you picked the right file. Then tap the Share button at the bottom of the screen.
- In the share sheet, choose AirDrop and wait for nearby devices to appear. Your Apple Vision Pro must be awake and close by for its icon to show up. If you do not see it, check that AirDrop receive mode on the headset allows contacts or everyone.
- Tap the Vision Pro icon when it appears in the AirDrop list. Your iPhone prepares the file, then starts sending it over the local wireless link. For short clips, this transfer usually finishes in a few seconds.
- Put on Apple Vision Pro if you are not already wearing it and accept the AirDrop request that appears in your view. Once you accept, the clip saves into Photos on the headset. From there it is ready to watch even if you go offline.
Knowing how to use iPhone spatial video transfer options saves time on the day of an event. Use iCloud when you prefer a hands-off sync that gathers all your spatial clips over time. Use AirDrop when you just recorded something special and want to play it on Apple Vision Pro right away.
Playing back spatial video on Vision Pro
Once you know how to use iPhone spatial video, viewing it on Apple Vision Pro feels very natural once you do it a couple of times. Start on the home view of visionOS and look at the Photos app icon so it highlights. Tap your thumb and index finger together to select it, and the app opens in front of you.
On the left side of Photos, you will see a sidebar with sections for your library. Look for the Spatial entry and select it to filter your view down to only 3D photos and videos from your iPhone and the headset. This makes it easy to avoid scrolling through screenshots or normal clips while you look for your best spatial take.
- Standard floating window mode
When you open a spatial video from this view, it first appears inside a large rectangular window that hangs in your real room or chosen background. Even in this standard mode, people and objects feel solid, with clear separation between foreground and background. This mode gives your brain a stable frame around the action, which helps users who are sensitive to motion feel safe. - Immersive dome mode
In the top right corner of that window, you will see an Immersive button. Select it and the video grows into a wide curved surface that fills most of your field of view. The edges fade softly into your surroundings, so it feels like the moment sits right in front of you at life size instead of inside a frame.
If you or a friend start to feel even mild discomfort, switch back to the floating window. That simple change usually settles things quickly while still giving full 3D depth. Once you know how your body reacts, you can decide scene by scene which mode fits best.
Common spatial video problems and how to fix them
Most problems with how to use iPhone spatial video come from a short list of causes, which means they are easy to diagnose once you know what to look for. Distance, light, and movement are the usual suspects, followed by storage limits and disabled settings. A quick check against the table below can save you from guessing.
Here is a simple problem‑and‑fix guide you can keep in mind on your next shoot.
| Problem | Likely cause | Quick fix |
|---|---|---|
| Footage looks flat with little 3D effect | Subject stands farther than about 8 feet away | Move closer and frame main subject around 4 to 5 feet away |
| Grainy or shimmering image in the headset | Scene recorded in a dark or harsh contrast space | Record in brighter, more even light or move outdoors |
| Viewer feels motion sick on Vision Pro | Handheld clip shakes or pans quickly | Use a tripod or gimbal and watch in standard window mode |
| Eye strain or ghosting around subjects | Subject stands closer than about 3 feet | Back up until subject sits inside the 3 to 8 feet zone |
| Spatial video icon not present in Camera | Feature disabled or iOS version too old | Turn on Spatial Video in Settings and update to iOS 17.2 or later |
| Storage full or recording stops early | Spatial files use around 130 megabytes per minute | Free local space or use iCloud Photos to offload older clips |
Large files and sensitive depth are simply part of spatial video, not signs that you are doing something wrong. Planning storage ahead of a big event and following the distance and light rules will prevent most issues. For more detailed troubleshooting, Cinematic Mode breaks down these same problems with extra shooting diagrams and examples.
Quick checklist before an important moment: Is the Spatial toggle on? Is your subject 3–8 feet away? Is the light soft and even? If you can answer yes to those three, you are in good shape.
Frequently asked questions
Question: Can I record spatial video on a standard iPhone 15 (non‑Pro)?
Answer: No, you cannot record spatial video on a standard iPhone 15. Only iPhone 15 Pro, 15 Pro Max, 16 Pro, 16 Pro Max, 17 Pro, and 17 Pro Max support it. If you want to know how to use iPhone spatial video, you need one of these Pro models. The non‑Pro models lack the side‑by‑side lens layout and Pro‑tier processor that spatial capture needs.
Question: Does spatial video work in portrait (vertical) orientation?
Answer: No, spatial video does not work in portrait orientation. In vertical position, the cameras sit on top of each other instead of side by side, so the phone cannot record proper 3D. The Camera app clearly asks you to rotate to landscape before recording.
Question: How much storage does spatial video use?
Answer: Spatial video uses about 130 megabytes per minute at 1080p 30 frames per second. That is more than most normal clips, so long recordings can fill smaller phones fast. Check your free space before big shoots and consider iCloud Photos or regular offloads.
Question: Can I watch iPhone spatial video without an Apple Vision Pro?
Answer: Yes, you can watch spatial clips without Apple Vision Pro, but they play as normal 2D videos. On iPhone, iPad, or Mac, the system ignores the extra depth view and shows a flat image. You can also convert files for other VR headsets with third‑party tools.
Question: What is the resolution and frame rate of iPhone spatial video?
Answer: iPhone spatial video records at 1080p resolution and 30 frames per second. It does not record 4K spatial clips yet, so very large immersive domes can look softer than Apple TV content in the headset. Still, the depth and sense of presence feel very strong for personal memories.
Start capturing memories in three dimensions
By now you know how to use iPhone spatial video from first setup to final playback. You confirm that your Pro model supports it, turn on the toggle in Settings, and switch to Spatial mode in the Camera app. Then you follow the three big rules while you record—good distance, clean light, and smooth movement—before sending clips to Apple Vision Pro.
Treat spatial video as a learnable skill instead of a magic button. Your first tries may feel a little shaky or flat, and that is fine. Each time you adjust subject distance or steady your hands, the 3D effect improves and your friends stay in the headset longer.
When you want to go deeper, Cinematic Mode has step‑by‑step tutorials that cover Cinematic Mode workflows, advanced stabilization, and post‑production tweaks for spatial footage. For now, you have enough to start recording real 3D memories. Pick a simple scene, turn on spatial video, and record a short, steady clip so you can see your own world in three dimensions.
Now you know how to use iPhone spatial video to capture immersive 3D memories.