

Cinematic Mode is a powerful iPhone video feature that lets you shoot and edit videos with a shallow depth of field — just like in the movies. It creates beautifully blurred backgrounds and foregrounds, helping your subject stand out and giving your content a cinematic look.
First introduced on the iPhone 13, Cinematic Mode on iPhone adds a film-style touch to your videos with just a tap.
In this guide, you’ll discover 10 Cinematic Mode tricks Apple never officially shared. You’ll also learn how to use Cinematic Mode on iPhone, improve video quality, edit cinematic footage, and use tools like Final Cut Pro to color grade your videos right from your iPhone.
Whether you’re a beginner or intermediate creator, we’ll cover focus control, lighting, depth of field, framing, and other techniques to help you shoot stunning cinematic videos on iPhone.
These cinematic mode tricks will help you get the most out of your iPhone’s camera.
Key Takeaways:
- Cinematic Mode on iPhone is a powerful tool for creating quality videos with a professional-looking film look.
- Take control of your focus and exposure, lighting, stabilization, and framing to enhance your footage and improve your footage.
- Use editing apps like iMovie or third-party options to edit cinematic mode videos and make your footage stand out.
What is Cinematic Mode?
According to Apple, Cinematic Mode is a groundbreaking feature available on iPhone models such as the iPhone 13 and iPhone 15 Pro, allowing users to shoot cinematic videos with high-quality resolution and a professional cinematic look. This innovative mode applies a depth-of-field effect, enabling the creation of beautifully blurred backgrounds and foregrounds, reminiscent of Hollywood films.
It makes capturing stunning visuals that stand out easier than ever. With its intuitive interface and advanced camera settings, Cinematic Mode enhances the video recording experience for both beginners and intermediate users, enabling them to create cinematic video content effortlessly.
Why Use Cinematic Mode?
The benefits of using Cinematic Mode on the iPhone include improved video quality that rivals professional filmmaking, achieving videos with a cinematic quality and polished look that enhances any project, and user-friendly functionality that requires minimal training, making it accessible for inexperienced videographers.
Users can achieve a cinematic aesthetic without the challenges and limitations typically associated with high-end cameras, tripods, gimbals, and specialized filming equipment.
These cinematic mode tricks can help you get more out of your iPhone’s camera, even if you’re just starting out.
With the appropriate camera settings, such as frame rate, aperture, and focus control, anyone can create high-quality videos that captivate and engage their audience.
Mastering cinematic mode tricks like depth control and focus pulling can dramatically elevate your mobile videos.
Better Video Quality
Cinematic Mode delivers stunning 4K resolution at frame rates of up to 60 fps, ensuring smooth playback that dynamically adjusts to varying lighting and motion conditions, utilizing hdr and bokeh effects. This feature creates a narrow depth of field, which beautifully isolates subjects from their backgrounds.
The iPhone 15 Pro and iPhone 15 Pro Max harness the processing power of their A17 Pro chip to achieve these impressive results. The iPhone 14 series also offers many of these features, although it has some limitations in processing power.
The capability to apply a narrow depth of field allows for striking isolation of subjects within a frame, focusing on the subject. Additionally, by employing computational photography techniques, both the iPhone 15 series and iPhone 14 series enable users to refocus subjects after recording, providing creators with enhanced editorial flexibility and the ability to change the focus.
Professional Look and Feel
The iPhone’s Cinematic Mode offers a sophisticated way to create videos that have a professional appearance and look cinematic. This feature utilizes background blur, depth of field, and saturation adjustments to enhance the filmic quality of your recordings. Users can manipulate focus points, ensuring that the subject of the video remains sharp while the background is softened and blurred. This allows for greater control over where you want the viewer’s attention to be, including the subject and the background. When used effectively, these techniques enable even amateur iPhone filmmakers to achieve a cinematic quality that was once thought to be attainable only with expensive equipment.
Cinematic Mode also gives users the ability to control focus transitions, enabling smooth shifts that mimic the work of trained cinematographers, facilitating filmmaking with your iPhone. For instance, you can shift focus between two characters engaged in dialogue, creating a more immersive experience for viewers.
To use Cinematic Mode effectively, consider the following tips:
- Utilize depth of field to isolate your subjects, making them stand out against the background.
- Experiment with lighting and angles to enhance the cinematic feel.
- Consider using different frame rates, such as 24 frames per second, in combination with these techniques to enrich the texture of your video.
By incorporating these elements, even the most ordinary moments can be transformed into cinematic experiences that exceed expectations, producing stunning videos and films with your iPhone.
Easy to Use
Cinematic Mode is particularly beneficial for regular iPhone users who wish to create cinematic-quality videos without needing extensive training or experience in filmmaking. Its user-friendly controls, intuitive settings, and real-time focus adjustments enable users to quickly learn how to capture stunning videos and films. Whether for family memories or creative projects, this mode allows anyone to make cinematic videos with your iPhone using minimal training and effort.
The app’s sleek design encourages exploration, prompting users to experiment with different effects and settings, planning to shoot with confidence.
This is especially significant for amateur videographers who may lack the skills to create captivating videos.
Four key factors make this mode especially useful for amateur video creators:
- Intuitive Controls: The easy-to-find and understand controls facilitate smooth navigation and settings adjustments, helping you focus while you record. Users don’t need extensive training or hours of practice to use this mode effectively, unlike many advanced settings found in professional video equipment.
- Real-Time Feedback: Through visual and auditory cues, users receive immediate feedback on how their adjustments will impact the final video, allowing them to adjust the exposure and focus on the subject. This allows them to see, hear, and feel the effects of their changes, encouraging them to explore and experiment with various settings and effects.
- Sense of Community: The social sharing features enable users to share their videos with friends, family, and followers on various social media platforms. This fosters a learning environment where users can gain inspiration from each other’s videos, ultimately helping to improve their own skills over time. As a result, users feel empowered to explore their creativity and produce professional-looking videos.
- Explore Tricks Gradually: Apply one or two cinematic mode tricks at a time to build confidence before experimenting with more advanced techniques.
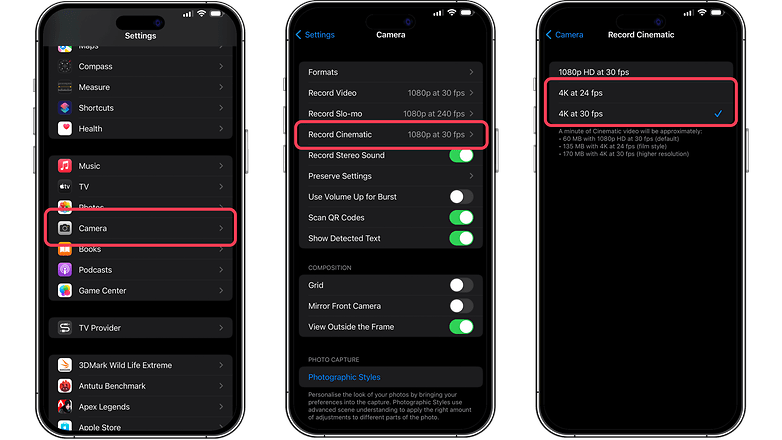
How to Access and Enable Cinematic Mode?
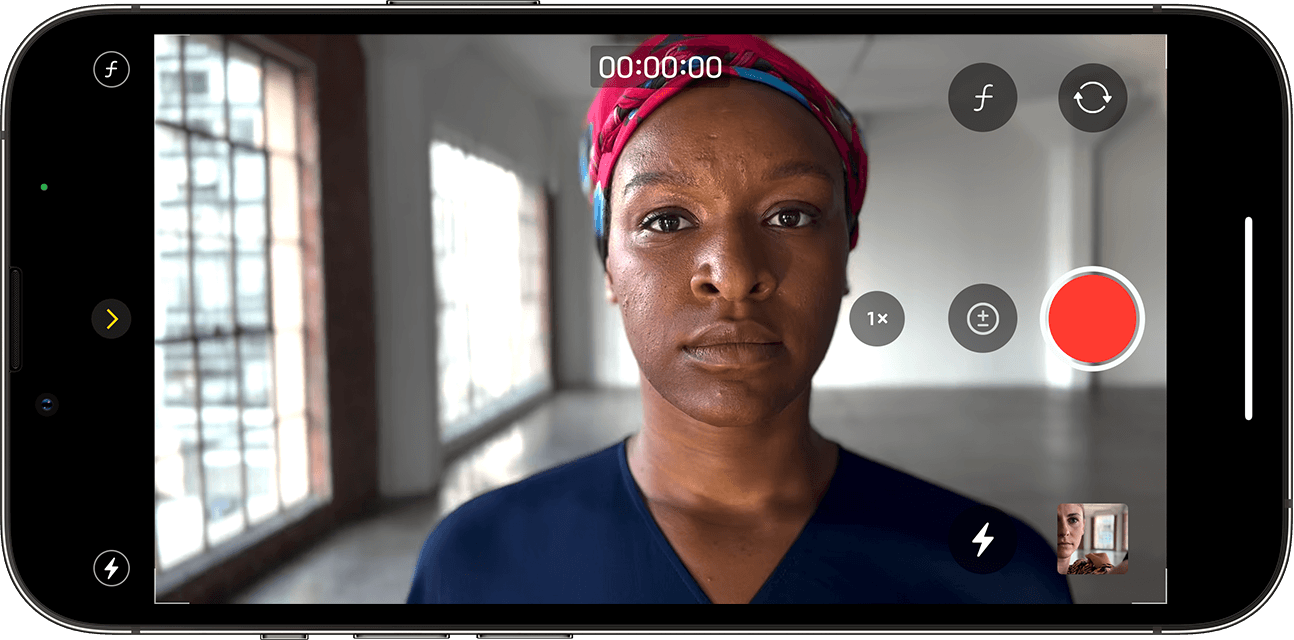
Cinematic Mode on iPhones can be accessed and enabled through the Camera app. Users with an iPhone 13 or later can open the Camera app, swipe to the Video option, and select Cinematic to start recording.
This mode offers features such as focus control and depth of field. Understanding how to access and adjust these features is the first step toward capturing high-quality video footage.
10 Must-Know Cinematic Mode Tricks Apple Didn’t Tell You
To achieve the most effective results with Cinematic Mode, it is essential to utilize several key iPhone Cinematic Mode tips, including using a gimbal for stabilization and applying HDR for enhanced quality.
Focus control, lighting, stabilization, and framing are crucial elements for creating a cinematic look, which can elevate any video from mediocre to stunning.
Regardless of whether you are shooting in bright sunlight or dim conditions, understanding how to adjust these factors will enable you to capture beautiful videos with cinematic quality.
Mastering these cinematic mode tricks ensures your footage not only looks stunning but also feels professional.
Control Focus Manually
Manually controlling focus in Cinematic Mode is essential for ensuring that the subject of your video remains sharply defined, while the background is beautifully blurred, allowing you to shoot cinematic videos with ease.
This feature allows users to set a specific point of focus, enabling them to tell a story in their desired manner by highlighting certain parts of the frame over others.
Understanding how to adjust the focus while recording adds depth to your footage, resulting in a more engaging experience for viewers, making your footage look cinematic.
The ability to control focus significantly enhances video production, particularly in narratives where the emotional impact hinges on small details.

For instance, in a scene where two actors are engaged in a confrontational dialogue, shifting the focus from one actor to the other can heighten tension and intimacy, drawing the audience deeper into the moment.
Techniques such as the following can be employed to achieve this:
- Rack Focus: Shifting focus from one subject to another to guide the viewer’s attention.
- Focus Pull: Changing focus while the camera is in motion, creating a more cinematic feel.
- Depth of Field Manipulation: Adjusting the background to ensure the subject of focus is clear.
These techniques can be used to create visually stunning works that not only entertain but also foster a deeper emotional connection with the audience.
Utilize Natural Lighting
Effectively utilizing natural lighting can significantly enhance the quality of videos shot in Cinematic Mode on the iPhone, making them more vibrant and visually appealing with a cinematic quality.
Natural light enriches videos with detail and depth, which are essential indicators of high-quality production in the film industry. Whether capturing scenes during the golden hour or using window light indoors, mastering exposure settings and natural light techniques will help you create better videos with a cinematic look.
To start, it’s crucial to understand the role of light in video production. Natural light can transform a mundane shot into something captivating by highlighting features and emotions. Here are some techniques to consider:
- Timing is Everything: Shoot during the golden hour—shortly after sunrise and before sunset—for the softest and most flattering light, which can be optimized using your iPhone camera.
- Experiment with Angles: Adjusting the camera angle in relation to the light source can produce different effects. Side lighting can add dimension and texture to your subject.
- Use Exposure Settings Wisely: Be sure to adjust ISO, aperture, and shutter speed to prevent overexposure or underexposure, as these issues can result in blurry footage, similar to how Hollywood movies are shot at 24 fps for consistency.
Use a Tripod or Stabilizer
Utilizing a tripod or stabilizer while filming longer scenes, especially in Cinematic Mode on the iPhone 13, is essential for achieving steady and professional-looking footage. This approach can help keep the subject of your video sharp.
These tools help reduce camera shake and enable filmmakers to maintain focus on the subject, particularly during extended shots. The result is smooth and fluid motion that emulates professional cinematography, enhancing the overall quality of the project. By incorporating gimbals or sturdy tripods, filmmakers can significantly improve the production value of their iPhone footage.
Stabilization is a critical aspect of video production that minimizes distractions caused by unwanted movements, allowing filmmakers to direct the viewer’s attention where it is needed. This can help avoid the disorientation often caused by shaky shots or excessive panning and tilting, which may lead viewers to miss important details within the frame.
For those looking to maximize the benefits of using tripods and stabilization equipment in their films, the following three recommendations can greatly enhance their effectiveness:
- Choose the Right Equipment: Different filming styles may require various tools, making it crucial to select a tripod or gimbal that matches your shooting approach. For example, lightweight gimbals are better suited for dynamic action shots, while sturdy tripods are ideal for static interviews.
- Practice Setup: Familiarizing yourself with the setup and operation of the equipment is vital for ensuring its optimal use. Understanding how to properly balance a camera on a gimbal can significantly enhance the tool’s effectiveness.
- Scope and Limit Use: While tripods and gimbals can greatly elevate the quality of film projects, they are not necessary for every shot. Recognizing which shots can be captured handheld and which require stabilization is essential to prevent slowing down filming or introducing unnecessary distractions.
By following these practical recommendations, filmmakers can effectively use stabilization tools to elevate their storytelling capabilities.
Experiment with Different Framing Techniques and Video Resolution
Experimenting with various framing techniques is crucial for creating visually compelling videos in Cinematic Mode, as composition plays a vital role in storytelling. By utilizing different framing methods, filmmakers can influence a viewer’s perception and emotional response to the narrative.
For instance, the rule of thirds divides the frame into a grid, guiding the placement of subjects along the intersecting lines. This approach not only adds balance to the shot but also helps highlight important elements, making scenes more engaging, similar to how cinematic mode with your iPhone allows for creative storytelling.
Incorporating leading lines can direct the viewer’s attention toward a subject, while utilizing negative space can provide subjects with breathing room within the composition. Examples of these techniques include:
- Leading Lines: Features such as roads, rivers, or architectural elements that guide the viewer’s gaze toward the subject.
- Negative Space: Surrounding a subject with a significant amount of empty space can evoke feelings of isolation or help maintain focus on the subject.
By employing these and other framing techniques, videographers can craft narratives that resonate more profoundly with viewers, thereby enhancing the overall storytelling experience and ensuring the subject of your video remains sharp.
How to Edit Cinematic Mode Videos and Photos on iPhone?
Editing Cinematic Mode videos and photos on your iPhone is straightforward, thanks to a variety of available tools, including tips and tricks for better results. One of the most accessible options for beginners is Apple’s iMovie app, which offers basic features such as trimming, color grading, and adding transitions to help users polish their footage with ease.
Plus iMovie, there are many third-party editing apps that provide advanced editing options, allowing iPhone users to elevate their cinematic videos, regardless of their level of expertise.
Use Apple’s iMovie App
Apple’s iMovie app is an excellent choice for editing videos captured in cinematic mode, offering a variety of user-friendly features specifically designed for iPhone users. With iMovie, users can trim clips, adjust color grading, and apply transitions to craft their final videos. Its intuitive interface makes it ideal for beginners, while also providing sufficient tools for intermediate users to advance their filmmaking projects.
As users delve into video editing, they will appreciate how iMovie leverages cinematic mode’s features such as depth control and focus adjustments—key elements in producing a professional-looking film.
Here are the steps to edit cinematic mode videos using the iMovie app:
- Import your footage: Open the iMovie app and create a new project. Select the cinematic mode videos from your camera roll that you wish to edit and import them into the project.
- Trim and arrange clips: Choose the video clips you want to edit and drag them into the timeline. Click on a clip to select it, then adjust the clip’s length by dragging the yellow trimming handles at either end. This vital first step ensures you have the right footage to effectively tell your story.
- Add color adjustments: Click on the Color Adjustments icon, then use the color correction controls to modify the video’s brightness, contrast, and saturation. This allows you to establish a subtle tone and mood for your final video.
- Incorporate transitions: Select the Transitions tab at the top of the screen to apply transitions between video clips. Transitions help smoothly connect one story point to the next, and there are various styles to choose from.
By utilizing these features, filmmakers can transform their raw cinematic mode footage into engaging cinematic narratives, akin to creating a beautifully blurred foreground to enhance focus.
These cinematic mode tricks help beginners and casual creators edit with confidence and bring their iPhone videos to life.
Try Third-Party Editing Apps
Advanced editing options for cinematic mode videos can be accessed and downloaded through various third-party editing apps, such as using Final Cut Pro on iPhone.
Some of the best video editing applications for iPhone, such as FilmoraGo, LumaFusion, and Adobe Premiere Rush, offer a wide range of features that help users enhance video quality, apply effects, and customize transitions, giving their cinematic mode videos a professional touch.

Each of these applications has its unique advantages, allowing iPhone users to make your videos stand out with professional touches.
FilmoraGo features a user-friendly interface that allows inexperienced editors to quickly add cinematic effects and filters, significantly improving the overall video experience. LumaFusion is particularly popular among seasoned creators due to its multi-track editing system, which enables users to have precise control over audio and video layers—essential for crafting complex narratives.
Adobe Premiere Rush reveals its full potential when users consider the benefits of continuing their editing on desktop software. With Adobe’s Creative Cloud, mobile videographers can easily start their projects on their devices and seamlessly transition to their desktop software to continue editing.
By utilizing these applications, users can access features that enhance their filmmaking skills.
Common Mistakes to Avoid
Common mistakes when using Cinematic Mode include shaky footage, poor lighting conditions, overuse of the depth-of-field effect, incorrect focal lengths, and improper framing of shots. These issues can detract from video quality and the overall cinematic experience.
However, they can be addressed to improve the final product and ensure that the videos resonate with viewers.
Shaky Footage
Shaky footage is a common challenge encountered when shooting in Cinematic Mode, and it can significantly affect the overall quality of your videos. To minimize camera shake and ensure smooth, visually appealing shots, the use of stabilization tools such as tripods or gimbals is essential. Prioritizing stabilization can greatly enhance the cinematic quality and professionalism of iPhone footage.
The causes of shaky footage often arise from various factors, including handheld shooting, uneven terrain, and sudden movements during filming. These disturbances can create distracting visual noise that detracts from the viewer’s experience. However, effective solutions can help mitigate these challenges.
For example, using a tripod provides a stable foundation, eliminating inadvertent shakes caused by hand movements. On the other hand, a gimbal offers superior stabilization during dynamic shots, allowing for fluid motion transitions without compromising quality.
By adopting various stabilization techniques, filmmakers can enhance their filming experience. Additionally, utilizing post-production software can further aid in stabilizing footage. By incorporating these tools and techniques, videographers can significantly improve their visual storytelling.
Poor Lighting
Lighting plays a significant role in the cinematography of your photos and videos, often resulting in a flat appearance and muted colors if not handled properly. Learning effective lighting techniques and adjusting exposure settings can help mitigate these issues. By utilizing natural light or incorporating additional lighting, you can dramatically enhance the overall quality of videos shot in Cinematic Mode.
When lighting is insufficient, the footage can appear grainy, which is an undesirable characteristic in professional videography. Effective cinematic cinematography requires a careful balance between light and shadow, both of which play crucial roles in the storytelling process.
Here are some common techniques for improving lighting conditions:
- Using Natural Light: Positioning subjects near windows allows beautiful soft light to filter in, ideal for capturing 4k videos.
- Using Softboxes or Diffusers: These tools create softer, more flattering light.
- Using Reflectors: Reflectors can bounce light onto a subject where it’s needed, effectively filling in shadows.
Additionally, adjusting exposure settings on a camera like the iPhone’s screen can significantly impact how light is captured. Proper exposure settings ensure that colors are vibrant and that details in both highlights and shadows are preserved, leading to more captivating visuals.
Overusing Cinematic Mode
While Cinematic Mode offers many desirable features, such as depth of field and a cinematic look, these effects can be overused, resulting in a busy and confusing visual experience. It is crucial to find the right balance in utilizing these features without overwhelming the story.
Excessive use of Cinematic Mode can detract from the video’s meaning and overwhelm viewers with too many effects. When experimenting with creativity in video production, it is essential to exercise caution and avoid going overboard with such an impressive feature.
Filmmakers and content creators often discover that an over-reliance on background blurring and focus shifts can undermine the narrative, leaving audiences feeling lost and disconnected from the subject. To avoid these common issues, the following best practices can be helpful:
- Use depth of field sparingly and only to highlight significant moments,
- Refrain from constant focus shifts as this creates visual clutter,
- Opt for simple, well-framed shots.
By following these practices, cinematic effects can enhance the story rather than detract from it.
Conclusion
When a new subject is identified, it’s crucial to plan your shots accordingly.
In conclusion, the Cinematic Mode on iPhone represents a significant advancement in mobile videography, allowing users to effortlessly create high-quality cinematic videos.
By understanding its features, mastering focus control, and applying effective lighting and stabilization techniques, iPhone users can enhance their iPhone filmmaking to professional standards—just like the examples covered in our Cinematic Mode on iPhone (2026) review.
The ability to shoot, edit, and refine footage seamlessly makes Cinematic Mode an invaluable tool for both beginner and intermediate videographers, especially at 4k at 24 fps.
Embracing these techniques will not only improve your visual storytelling but also inspire creativity and innovation throughout your iPhone video filmmaking journey.
Additional Resources for Mobile Video Creation
Utilizing the Photos app can further enhance your editing capabilities.
For those interested in further enhancing their skills in mobile video creation, a variety of additional resources are available to help you master cinematic videos using your iPhone, including the iPhone user guide.
From online tutorials and workshops to forums and communities dedicated to mobile filmmaking, these resources provide valuable insights, tips, and techniques to elevate your cinematography.
Whether you’re just starting or looking to refine your skills, tapping into these resources can greatly enrich your filmmaking journey and enable you to create stunning visual content that remains sharp while creating.
Watch: Cinematic Mode Tricks in Action
See how pro creators apply cinematic mode tricks—focus pulls, lighting setups, and stabilization—all done with an iPhone.
Frequently Asked Questions
What is Cinematic Mode on the iPhone?
Cinematic Mode is a feature on the iPhone that allows you to create professional-looking videos with enhanced focus control, cinematic framing, and advanced editing options. It is perfect for mobile video creators looking to improve their video quality.
How many Cinematic Mode tricks does Apple offer?
Apple has provided 10 Cinematic Mode tricks that can help you take your videos to the next level. These tricks include tips on focus control, lighting, stabilization, framing, and editing.
Can I adjust the focus in Cinematic Mode?
Yes, you can adjust the focus in Cinematic Mode by tapping on the subject you want to focus on. This allows you to create a cinematic depth of field and keep your subject in sharp focus while blurring the background.
How can I improve lighting in Cinematic Mode?
To improve lighting in Cinematic Mode, make sure you have good natural or artificial lighting. You can also use the iPhone’s built-in lighting tools to adjust the exposure, contrast, and white balance of your video.
Can I stabilize my videos in Cinematic Mode?
Use a gimbal or tripod while shooting. For handheld shots, keep your elbows close to your body and move slowly.
Are there any tips for framing in Cinematic Mode?
To achieve the best framing in Cinematic Mode, use the rule of thirds and experiment with different angles and perspectives. You can also use the virtual horizon in the camera app to keep your shots level and straight.